A Guide to WordPress Image Settings {Title, Alt Text, Link to…}
Let’s kick this off with some good news: You do not have to fill everything out. Some of the WordPress image settings are a must. Some of them are optional. And some are literally pointless. The key is to know which is which.
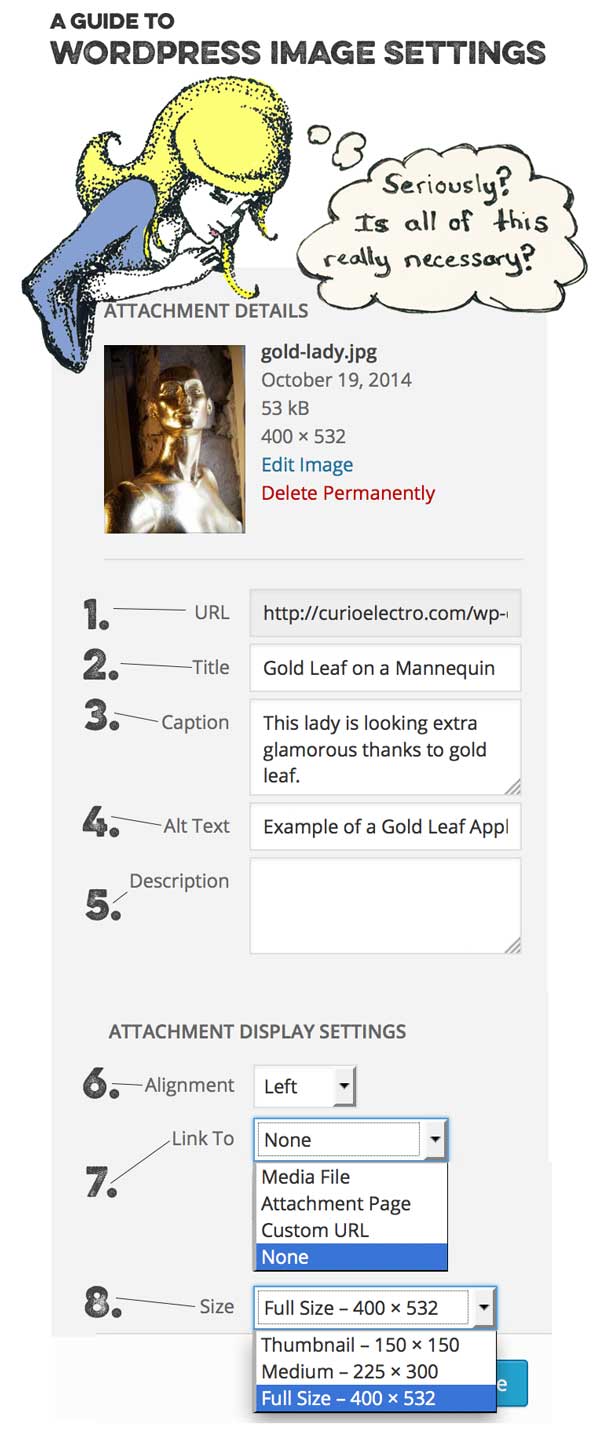
1. Url
Nothing to change here. It’s generated automatically and can’t be altered. BUT you could use this url to embed your image in a marketing email (MailChimp, AWeber, etc.), email signature or some other place on the internet. If you embed an image using the url, it will pull the image from where it lives (your website) instead of asking you to upload it directly from your computer.
Leave it As-Is
2. Title
Extra information that will sometimes (only in certain browsers) appear as a “tooltip” when the user hovers over the image, so make sure it’s not embarrassing. This does have SEO value. If you don’t make any changes, it defaults to the original name of the image file. So you’ll either want to name your file with relevant keywords when saving it to begin with or change it here. Provides searchable information within your Media Library, so it could be useful if you have a huge amount of media and will need to find the image later.
Always
3. Caption
When filled in, this places smaller text just below the image. It can be useful for photo credits, commentary or just to explain what’s happening in the image.
Optional
4. Alt Text
The real intention of Alt Text is to provide text if the image (for some reason) doesn’t load. But it also tells search engines what is happening on the image (which is how images are ranked for Google images and the like) and is used as the default description when an image is pinned to Pinterest. Always fill this in. Use relevant keywords, but make sure they provide an accurate description of the image. As with any other aspect of SEO, “keyword stuffing” or otherwise trying to game the system will only get you penalized.
Always
5. Description
Only appears when the image links to an “Attachment Page”, which is a silly option. Don’t even bother filling this out.
Never
6. Alignment
Generally, you’re going to want to choose from “Left” (image sits all the way to the left, with text wrapping around the right side), “Right” (image sits all the way to the right with text wrapping around the left side), or occasionally “Center” (image is centered with text sitting below and/or above it). “None” is the final option, which pushes the image to the left, but keeps text from wrapping, so there is a blank space to the right of the image.
Always
7. Link To
Never leave this at the default “Media File” setting. The user will click on the image and land on a page with no navigation and a weird blank background. Never choose “Attachment Page” (unless you have some creative reason for it that hasn’t occurred to me). The user will end up on page within your website that just shows the image and not much else. You’re generally going to choose “None”, which means your image will not link to anything or “Custom Url” and then enter a full url in the field below. But seriously, most of the time…you’ll choose “None”.
Always
8. Size
In theory, you will have already sized and compressed your image to speed up the page load time. If you have, you’ll choose “Full Size”. If not, WordPress will offer you a few different options for sizing the image. Choose one.
Always
And then click “Insert into Post”. Done.
If you want to change anything once you’ve inserted the image, there are two options:
1. Edit the post in “Text” view. Find the image in the code and make the changes right there. Everything is labeled.
2. Edit the post in “Visual” view. Click on the image, then click on the little pencil icon to reveal the “Image Details” pop-up. It will allow you change pretty much all of the above choices and also adds the option, if you’re using the image as a link, to open the link in a new window.
I’ll leave you with an old WordPress proverb:
‘Tis better to upload an image with no style
Than to make this mistake: “Link to Media File”
Ok, fine. I just made that up. But it’s true.




Jen Vertanen
| 23 October 2014What an AWESOME resource!! I always struggle with this :). Sharing with my twitter peeps too!
curioelectro
| 23 October 2014Many thanks for sharing it on Twitter, Jen.
Beth
| 23 October 2014I was just wondering about this very thing this week! You’re in my head.
I had just been leaving the defaults due to ignorance, so thanks for breaking this down for me!
curioelectro
| 23 October 2014Ha! That’s wonderful. If ONE person stops leaving everything at the default settings…this post will not have been in vain:)
Erin E Flynn
| 23 October 2014Excellent! This is exactly what I need to send clients who ask! Thanks!
curioelectro
| 23 October 2014Oh, perfect. Glad you hear it will be useful.
Lisa
| 23 October 2014This is awesome! Thank you 🙂
curioelectro
| 23 October 2014You’re so welcome!
Solveig
| 23 October 2014Hi! Do you know which field it is Pinterest pulls information from? It automatically names an image when you pin it and I think it’s the name field, and if so its a good idea to fill it out if it’s a picture you think might be shared, but I’m not sure?
curioelectro
| 23 October 2014As I mentioned in the post, that would be the “Alt Text” field. So that field is doing double duty: describing the image for search engines AND acting as the default description when someone pins to Pinterest using the typical method. Hope that helps!
Kat Bern
| 23 October 2014This is great advice! And finally spelled out so clearly 🙂
I love this post.
curioelectro
| 23 October 2014Thank you, Kat:)
Penny Bergstrom
| 21 December 2015Great article! You make SEO easy and fun! Thanks.